
공부방
Vue Router 본문
Vue Router
- 중계기
- 라우팅 : 웹 페이지 간의 이동 방법
- Vue.js
- 라우트(route)에 컴포넌트를 매핑한 후, 어떤 주소에서 렌더링할 지 알려줌
- SPA상에서 라우팅을 쉽게 개발할 수 있는 기능을 제공
- URL에 따라 컴포넌트를 연결하고 설정된 컴포넌트를 보여줌
Vue Router 설치
- CDN방식
- <script src="/path/to/vue.js"></script>
- <script src="/path/to/vue-router.js"></script>
- NPM 방식
npm install vue-router - Vue CLI
vue add router
프로젝트를 진행하던 중에 추가를 하게 되면 App.vue를 덮어쓰므로 백업을 해두고 추가할 것
App.vue
<template>
  <div id="app">
    <img alt="Vue logo" src="./assets/logo.png" />
    <h2>안녕</h2>
    <HelloWorld msg="Welcome to Your Vue.js App" />
  </div>
</template>

<script>
import HelloWorld from "./components/HelloWorld.vue";

export default {
  name: "App",
  components: {
    HelloWorld,
  },
};
</script>

<style>
#app {
  font-family: Avenir, Helvetica, Arial, sans-serif;
  -webkit-font-smoothing: antialiased;
  -moz-osx-font-smoothing: grayscale;
  text-align: center;
  color: #2c3e50;
  margin-top: 60px;
}
</style>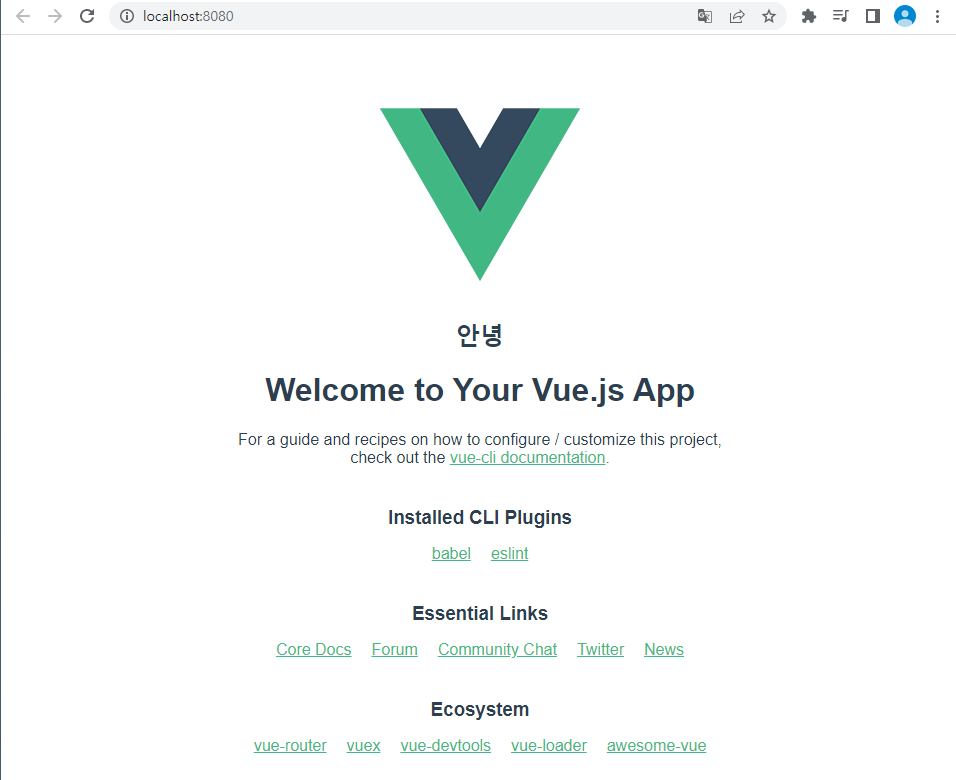
터미널에 vue add router를 작성하여 CLI형식으로 router 등록하면 이렇게 뜬다.
SSAFY@DESKTOP-DOGVPUB MINGW64 ~/Desktop/test/vue-router-app (master)
$ vue add router
 WARN  There are uncommitted changes in the current repository, it's recommended to commit or stash them first.
? Still proceed? (y/N)
N이 대문자로 뜨는건 추천하기 때문이고 덮어쓸 수 있으니 commit을 하고 오라는 경고 메시지가 나온다. 여기서 y를 누르면
Use history mode for router? (Requires proper server setup for index fallback in
production) (Y/n)
이렇게 나오고 라우터에는 모드가 history 모드와 hash모드가 있어서 history모드로 쓸 거냐고 물어본다. 여기서 Y를 누르면

M이라고 적힌 것들은 modify됐다는 뜻으로 변경됐다는 뜻으로 변경들이 일어나고 router와 views가 생긴다. 그리고 전에 App.vue에 적었던 안녕이 없어진다.
App.vue
<template>
  <div id="app">
    <nav>
      <router-link to="/">Home</router-link> |
      <router-link to="/about">About</router-link>
    </nav>
    <router-view/>
  </div>
</template>

<style>
#app {
  font-family: Avenir, Helvetica, Arial, sans-serif;
  -webkit-font-smoothing: antialiased;
  -moz-osx-font-smoothing: grayscale;
  text-align: center;
  color: #2c3e50;
}

nav {
  padding: 30px;
}

nav a {
  font-weight: bold;
  color: #2c3e50;
}

nav a.router-link-exact-active {
  color: #42b983;
}
</style>
그리고 Home과 About이라는 링크들이 생긴다.

components와 views
- 두개의 폴더는 각기 SFC(Single File Component) 파일을 저장함
- 어느 곳에 저장해도 상관은 없지만 주로 아래와 같이 작성
- App.vue : 최상위 컴포넌트
- views/ : router(index.js)에 매핑되는 컴포넌트를 모아두는 폴더
- components/ : router에 매핑된 컴포넌트 내부에 작성하는 컴포넌트를 모아두는 폴더
Vue Rouer- index.js
라우트에 관련된 정보 및 설정 작성
import Vue from "vue";
import VueRouter from "vue-router";
import HomeView from "../views/HomeView.vue";
import Aboutview from "../views/Aboutview.vue";

Vue.use(VueRouter);

const routes = [
  {
    path: "/",
    name: "home",
    component: HomeView,
  },
  {
    path: "/about",
    name: "about",
    component: Aboutview,
  },
];

const router = new VueRouter({
  mode: "history",
  base: process.env.BASE_URL,
  routes,
});

export default router;
index.js
// index.js는 router를 들고오기 위한 수단이다.
// 필요한 것들을 다 임포트해준다 예를 들면 밑에 것들
// views에 있는것들, router에 있는 것들
import Vue from "vue";
import VueRouter from "vue-router";
import HomeView from "../views/HomeView.vue";
import AboutView from "../views/AboutView.vue";
Vue.use(VueRouter);
// 임포트한 것들을 배열 형태로 만들어주고
const routes = [
{
path: "/",
name: "home",
component: HomeView,
},
{
path: "/about",
name: "about",
component: AboutView,
},
];
const router = new VueRouter({
mode: "history",
base: process.env.BASE_URL,
routes,
});
//이 router를 main.js로 export해준다. 그리고 main.js로 가보면
export default router;
================================================================
main.js
import Vue from 'vue'
import App from './App.vue'
import router from './router'
Vue.config.productionTip = false
//index.js에서 부른 router를 넣어준다.
new Vue({
router,
render: h => h(App)
}).$mount('#app')
================================================================
HomeView.vue
<template>
<div class="home">
<img alt="Vue logo" src="../assets/logo.png" />
<HelloWorld msg="하윙" />
</div>
</template>
<script>
// @ is an alias to /src
import HelloWorld from "@/components/HelloWorld.vue";
HelloWorld를 임포트한다.
export default {
name: "HomeView",
components: {
HelloWorld,
},
};
</script>
================================================================
HelloWorld.vue
<template>
<div class="hello">
<h1>{{ msg }}</h1>
이 msg로 msg를 불러온다.
<p>
For a guide and recipes on how to configure / customize this project,<br>
check out the
<a href="https://cli.vuejs.org" target="_blank" rel="noopener">vue-cli documentation</a>.
</p>
<h3>Installed CLI Plugins</h3>
<ul>
<li><a href="https://github.com/vuejs/vue-cli/tree/dev/packages/%40vue/cli-plugin-babel" target="_blank" rel="noopener">babel</a></li>
<li><a href="https://github.com/vuejs/vue-cli/tree/dev/packages/%40vue/cli-plugin-eslint" target="_blank" rel="noopener">eslint</a></li>
</ul>
<h3>Essential Links</h3>
<ul>
<li><a href="https://vuejs.org" target="_blank" rel="noopener">Core Docs</a></li>
<li><a href="https://forum.vuejs.org" target="_blank" rel="noopener">Forum</a></li>
<li><a href="https://chat.vuejs.org" target="_blank" rel="noopener">Community Chat</a></li>
<li><a href="https://twitter.com/vuejs" target="_blank" rel="noopener">Twitter</a></li>
<li><a href="https://news.vuejs.org" target="_blank" rel="noopener">News</a></li>
</ul>
<h3>Ecosystem</h3>
<ul>
<li><a href="https://router.vuejs.org" target="_blank" rel="noopener">vue-router</a></li>
<li><a href="https://vuex.vuejs.org" target="_blank" rel="noopener">vuex</a></li>
<li><a href="https://github.com/vuejs/vue-devtools#vue-devtools" target="_blank" rel="noopener">vue-devtools</a></li>
<li><a href="https://vue-loader.vuejs.org" target="_blank" rel="noopener">vue-loader</a></li>
<li><a href="https://github.com/vuejs/awesome-vue" target="_blank" rel="noopener">awesome-vue</a></li>
</ul>
</div>
</template>
<script>
export default {
name: 'HelloWorld',
props: {
msg: String
}
}
</script>
<!-- Add "scoped" attribute to limit CSS to this component only -->
<style scoped>
h3 {
margin: 40px 0 0;
}
ul {
list-style-type: none;
padding: 0;
}
li {
display: inline-block;
margin: 0 10px;
}
a {
color: #42b983;
}
</style>Vue Router-<router-link>
- 사용자 네비게이션을 가능하게 하는 컴포넌트
- 목표 위치는 'to' porp로 지정됨
- 기본적으로는 올바른 href를 갖는 <a>태그로 렌더링 되지만 'tag' prop로 구성될 수 있음
- HTML5 히스토리 모드에서 router-link는 클릭 이벤트를 차단하여 브라우저가 페이지를 다시 로드하지 않도록 함
Vue Router-<router-view>
- 주어진 라우터에 대해 일치하는 컴포넌트를 렌더링하는 함수형 컴포넌트
- 실제 component가 DOM에 부착되어 보이는 자리를 의미
- router-link를 클릭하면 해당 경로와 연결되어 있는 index.js에 정의한 컴포넌트가 위치
App-vue
<template>
  <div id="app">
    <nav>
      <!-- router-link : 기본은 a태그(GET요청)이다. -->
      <router-link to="/">Home</router-link> |
      <router-link to="/about">About</router-link>
    </nav>
    <!-- 클릭하면 router-view에 보이게 된다. -->
    <router-view />
  </div>
</template>

<style>
#app {
  font-family: Avenir, Helvetica, Arial, sans-serif;
  -webkit-font-smoothing: antialiased;
  -moz-osx-font-smoothing: grayscale;
  text-align: center;
  color: #2c3e50;
}

nav {
  padding: 30px;
}

nav a {
  font-weight: bold;
  color: #2c3e50;
}

nav a.router-link-exact-active {
  color: #42b983;
}
</style>
About을 누르면

Vue Router-History Mode
- vue-router의 기본 모드는 hash mode(URL에 #이 붙어 URL이 변경될 때 페이지가 다시 로드X)
- 해시를 제거하기 위해 HTML History API를 사용해서 router를 구현함
이름을 가지는 라우트(Named Routes)
- 라우트에 이름을 명명할 수 있음
- 명명된 경로로 이동하려면 객체를 router-link 컴포넌트의 to로 전달할 수 있음
- 경로가 바뀌어도 이름만 알면 편하게 이동 가능
index.js
// index.js는 router를 들고오기 위한 수단이다.

// 필요한 것들을 다 임포트해준다 예를 들면 밑에 것들
// views에 있는것들, router에 있는 것들
import Vue from "vue";
import VueRouter from "vue-router";
import HomeView from "../views/HomeView.vue";
import AboutView from "../views/AboutView.vue";

Vue.use(VueRouter);

// 임포트한 것들을 배열 형태로 만들어주고
const routes = [
  {
    path: "/",
    name: "home",
    component: HomeView,
  },
  {
    path: "/about",
    name: "about",
    component: AboutView,
  },
];

const router = new VueRouter({
  mode: "history",
  base: process.env.BASE_URL,
  routes,
});

//이 router를 main.js로 export해준다. 그리고 main.js로 가보면
export default router;
===============================================================
App.vue
<template>
  <div id="app">
    <nav>
      <!-- router-link : 기본은 a태그(GET요청)이다. -->
      <router-link to="/">Home</router-link> |
      <router-link :to="{ name: 'about' }">About</router-link>
      이름 명명
    </nav>
    <!-- 클릭하면 router-view에 보이게 된다. -->
    <router-view />
  </div>
</template>

<style>
#app {
  font-family: Avenir, Helvetica, Arial, sans-serif;
  -webkit-font-smoothing: antialiased;
  -moz-osx-font-smoothing: grayscale;
  text-align: center;
  color: #2c3e50;
}

nav {
  padding: 30px;
}

nav a {
  font-weight: bold;
  color: #2c3e50;
}

nav a.router-link-exact-active {
  color: #42b983;
}
</style>
정상동작한다.
프로그래밍 방식 네비게이션(Programmatic Navigation)
- <router-link>를 사용하여 선언적 네비게이션용 <a>태그를 만드는 것 외에도 router의 인스턴스 메서드를 사용하여 프로그래밍으로 이를 수행할 수 있다.
- Vue 인스턴스 내부에서 라우터 인스턴스에 $router로 접근할 수 있음
- 따라서 다른 URL로 이동하려면 this.$router.push를 호출할 수 있음. 해당 메서드는 새로운 항목을 히스토리 스택에 넣기 때문에 사용자가 브라우저의 뒤로 가기 버튼을 클릭하면 이전 URL로 이동하게됨
- <router-link>를 클릭할 때 내부적으로 호출되는 메소드이므로 <router-link:to"...">를 클릭하면, router.push(...)을 호출하는 것과 같다.

AboutView.vue
<template>
  <div>
    <h2>여기는 오바웃이다.</h2>
    <button @click="moveToHome">홈으로</button>
  </div>
</template>

<script>
export default {
  methods: {
    moveToHome() {
      this.$router.push("/");
      // 뒤로가기
    },
  },
};
</script>

<style></style>
홈으로를 누르면 뒤로 가서 Home으로 가진다.
동적 라우트 매칭(Dynamic Route Matching)
- 주어진 패턴을 가진 라우트를 동일한 컴포넌트에 매핑해야 하는 경우
- 동적 인자 전달
- 예를 들어 모든 User에 대해 동일한 레이아웃을 가지지만, 다른 User ID로 렌더링 되어야 하는 예시

- 동적 인자는 :(콜론)으로 시작
UserView.vue
<template>
  <div>
    <h2>사용자 정보 페이지.</h2>
    <h4>
      {{ $route.params.username }}
    </h4>
  </div>
</template>

<script>
export default {};
</script>

<style></style>
================================================================
index.js
// index.js는 router를 들고오기 위한 수단이다.

// 필요한 것들을 다 임포트해준다 예를 들면 밑에 것들
// views에 있는것들, router에 있는 것들
import Vue from "vue";
import VueRouter from "vue-router";
import HomeView from "../views/HomeView.vue";
import AboutView from "../views/AboutView.vue";
import UserView from "../views/UserView.vue";

Vue.use(VueRouter);

// 임포트한 것들을 배열 형태로 만들어주고
const routes = [
  {
    path: "/",
    name: "home",
    component: HomeView,
  },
  {
    path: "/about",
    name: "about",
    component: AboutView,
  },
  {
    path: "/user/:username",
    동적으로 데이터를 받기 위해 :을 사용하여 username을 받는다.
    name: "user",
    component: UserView,
  },
];

const router = new VueRouter({
  mode: "history",
  base: process.env.BASE_URL,
  routes,
});

//이 router를 main.js로 export해준다. 그리고 main.js로 가보면
export default router;
================================================================
App.vue
<template>
  <div id="app">
    <nav>
      <!-- router-link : 기본은 a태그(GET요청)이다. -->
      <router-link to="/">Home</router-link> |
      <router-link :to="{ name: 'about' }">About</router-link> |
      <router-link :to="{ name: 'user' }">User</router-link>
    </nav>
    <!-- 클릭하면 router-view에 보이게 된다. -->
    <router-view />
  </div>
</template>

<style>
#app {
  font-family: Avenir, Helvetica, Arial, sans-serif;
  -webkit-font-smoothing: antialiased;
  -moz-osx-font-smoothing: grayscale;
  text-align: center;
  color: #2c3e50;
}

nav {
  padding: 30px;
}

nav a {
  font-weight: bold;
  color: #2c3e50;
}

nav a.router-link-exact-active {
  color: #42b983;
}
</style>
동적으로 데이터를 받아보기->url : localhost:8080/user/hyun 이라고 작성하면

AboutView.vue
<template>
  <div>
    <h2>여기는 오바웃이다.</h2>
    <button @click="moveToHome">홈으로</button>
    <router-link :to="{ name: 'user', params: { username: 'hyun' } }"
      >내 페이지</router-link
    >
    |
    <router-link :to="{ name: 'user', params: { username: 'kang' } }"
      >이것도 내 페이지</router-link
    >
    |
    <router-link :to="{ name: 'user', params: { username: 'hello' } }"
      >누구세요</router-link
    >
  </div>
</template>

<script>
export default {
  methods: {
    moveToHome() {
      this.$router.push("/");
      // 뒤로가기
    },
  },
};
</script>

<style></style>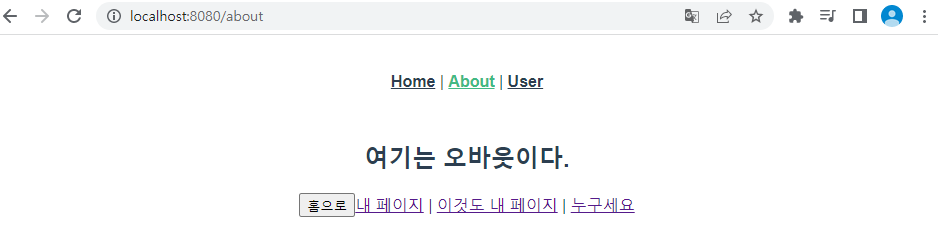
내 페이지에 들어가면

이것도 내 페이지에 들어가면 kang이 나오고 누구세요에 들어가면 hello가 나온다.
중첩된 라우트(Nested Routes)
- 실제 앱 UI는 일반적으로 여러 단계로 중첩된 컴포넌트로 구조임
- URL의 세그먼트가 중첩된 컴포넌트의 특정 구조와 일치하는 것을 활용
BoardView.vue
<template>
  <div>
    <h3>게시판</h3>
    <router-link to="/board/list">게시판 목록</router-link>
    <router-link to="/board/create">게시글 작성</router-link>
    <router-view />
  </div>
</template>

<script>
export default {};
</script>

<style></style>
================================================================
App.vue
<template>
  <div id="app">
    <nav>
      <!-- router-link : 기본은 a태그(GET요청)이다. -->
      <router-link to="/">Home</router-link> |
      <router-link :to="{ name: 'about' }">About</router-link> |
      <router-link :to="{ name: 'user' }">User</router-link> |
      <router-link :to="{ name: 'board' }">게시판</router-link>
    </nav>
    <!-- 클릭하면 router-view에 보이게 된다. -->
    <router-view />
  </div>
</template>

<style>
#app {
  font-family: Avenir, Helvetica, Arial, sans-serif;
  -webkit-font-smoothing: antialiased;
  -moz-osx-font-smoothing: grayscale;
  text-align: center;
  color: #2c3e50;
}

nav {
  padding: 30px;
}

nav a {
  font-weight: bold;
  color: #2c3e50;
}

nav a.router-link-exact-active {
  color: #42b983;
}
</style>
================================================================
BoardCreate.vue
<template>
  <div>
    <h2>게시글 작성</h2>
  </div>
</template>

<script>
export default {};
</script>

<style></style>
================================================================
BoardList.vue
<template>
  <div>
    <h2>게시판 목록</h2>
  </div>
</template>

<script>
export default {};
</script>

<style></style>
================================================================
index.js
// index.js는 router를 들고오기 위한 수단이다.

// 필요한 것들을 다 임포트해준다 예를 들면 밑에 것들
// views에 있는것들, router에 있는 것들
import Vue from "vue";
import VueRouter from "vue-router";
import HomeView from "../views/HomeView.vue";
import AboutView from "../views/AboutView.vue";
import UserView from "../views/UserView.vue";
import BoardView from "../views/BoardView.vue";
import BoardList from "../components/board/BoardList.vue";
import BoardCreate from "@/components/board/BoardCreate.vue";

Vue.use(VueRouter);

// 임포트한 것들을 배열 형태로 만들어주고
const routes = [
  {
    path: "/",
    name: "home",
    component: HomeView,
  },
  {
    path: "/about",
    name: "about",
    component: AboutView,
  },
  {
    path: "/user/:username",
    name: "user",
    component: UserView,
  },
  {
    path: "/board",
    name: "board",
    component: BoardView,
    children: [
      // 밑에 경로(path)에는 / 붙이면 안된다.
      { path: "list", component: BoardList },
      { path: "create", component: BoardCreate },
    ],
  },
];

const router = new VueRouter({
  mode: "history",
  base: process.env.BASE_URL,
  routes,
});

//이 router를 main.js로 export해준다. 그리고 main.js로 가보면
export default router;

'vue.js' 카테고리의 다른 글
| Vue Style Guide (0) | 2023.05.10 |
|---|---|
| Vue Axios (0) | 2023.05.10 |
| Vue CLI (0) | 2023.05.08 |
| Vue Component (0) | 2023.05.04 |
| Vue Event (0) | 2023.05.03 |
'vue.js' Related Articles
more


